Many R users enjoy working in RStudio, but it’s not your only option for reproducible research in R. Stephen Wahlbrink has written a plugin for Eclipse, Statet, that offers similar functionality to RStudio within the popular Eclipse framework. You can run an R console, debug a script, compose a document in LaTeX with R code chunks, and link the two through Sweave and the plugin. Statet first appeared in 2005. It continues to be supported and typically updates with new versions of Eclipse. Development is not as rapid as with RStudio, but new features do appear from time to time. Support for R Markdown has been added recently. You can also take advantage of other Eclipse plugins, such as the spell checker or support for Git. For people who already use Eclipse for development work, Statet could be an attractive choice.
Installation guide
I have used both Statet and RStudio extensively. They offer similar functionality and similar ease of use. RStudio has some nice features that Statet lacks, but my experience with RStudio has been disappointing in terms of stability and proneness to crashing. Statet has 11 years behind it, as well as the stability of the Eclipse framework itself. RStudio is certainly easier to get up and running. Eclipse can be tricky to configure, especially if you have not used it before. No worries: this tutorial will walk you through every step of the way.
The instructions shown here are based on a clean install of Kubuntu 16.04 and current versions of everything else, as of May 2016. These instructions should work for any Debian based distro. Most of this will also work with Fedora/Centos/RHEL, but I have sometimes found it harder to get up to date versions of things from the repositories these distros use.
Eclipse is cross-platform and this stack is also available to Windows users. The installations are similar, and I specify the differences in the details section. I have used Eclipse/R/Statet on a Windows system without administrator privileges and behind a firewall. I suggest tips for other users in similar controlled environments.
Here is an overview of the what you need to do.
- Install Java.
- Get Eclipse.
- Install R
- Obtain a LaTeX distribution
- From within Eclipse, install the Statet plugin.
- From within R, install packages rj and rj.gd from Walhbrink’s site.
- Launch Eclipse and configure for use with R and LaTeX
Warning: Don’t mix the bitage. Go 64 bit on everything, or 32 bit.
Most of the time, if I have an issue with installing Statet and Eclipse, it’s because I mixed 32 and 64 bit applications. The rest of the time, problems came from badly installing Java.
Install Java
On windows, you only need the runtime version (JRE) and you probably have this already. On Linux, you need the JDK, because R needs the JDK to compile the rj and rj.gd packages. On Ubuntu-based distributions, the following code installs Oracle’s JDK and configures the system. Kudos to Salem from AskUbuntu for this.
Open a terminal and enter:
sudo apt-add-repository ppa:webupd8team/java

sudo apt-get update

sudo apt-get install oracle-java8-installer

export JAVA_HOME=/usr/lib/jvm/java-8-oracle

sudo R CMD javareconf
The first line adds the PPA for webupd8. The second line refreshes apt-get. The third line installs the Java 8 installer and Oracle’s Java 8. The export line tells the system where to find Java, and the final line tells R. Done.
Get Eclipse : Download the current version from Eclipse.org. Linux users now get an installer for Eclipse. Extract the folder and run the script eclipse-inst. The “installer” creates a folder in your home directory called eclipse. No root privileges are required. There is a script, also called eclipse, that launches the IDE. You can create a desktop link to the script, if you like. The installation has helpfully provided an icon you can use to decorate your launcher.
Linux users : Avoid sudo apt-get install eclipse and download directly from the site. The repos are sometimes out of date.
Install R
You probably know how to do this already. A note to Windows users in controlled environments. Most of this can be done by users without administrative privileges. However, you will save yourself some trouble later on if you can convince your IT department to do the install for you. They can ensure that the location of your R install is preserved in the Registry. This makes it a lot easier for Eclipse to find R when you want to summon the console.
Install a LaTeX distribution
Windows users can install MikTex 2.9 from the installer. If you work behind a firewall, be sure to get the complete installation. The default provides a basic selection of packages and installs the rest as needed, on the fly. Your firewall won’t like that.
Warning! The
Recommended Downloadis the 32 bit version. If you are going 64 bit, be sure to download the 64 bit version underOther Downloads.
Linux users can use the version from the repo. If you use the synaptic package manager, go for texlive and texlive-extras, plus any other packages you expect to need. Texlive won’t install packages on the fly, so you need to get all the packages you use up front.
Extra instructions for Windows users
Windows users also need to inform Miktex where to find the Sweave.sty file. To do this:
- Open
Miktex Settings. This program comes with the Miktex installation. There is another program calledMiktex Settings (Admin). Ignore this one and use the plainMiktex Settings. - Select tab
Roots. - Click Add and navigate to folder
..\my R installation\share\texmf - Select this folder, save and exit
Miktex Settings. You’re done.
You may have noticed that Sweave.sty is not actually in the texmf folder. It’s a couple of folders lower down, but this is the folder that Miktex needs to know about.
Installing the Statet plugin
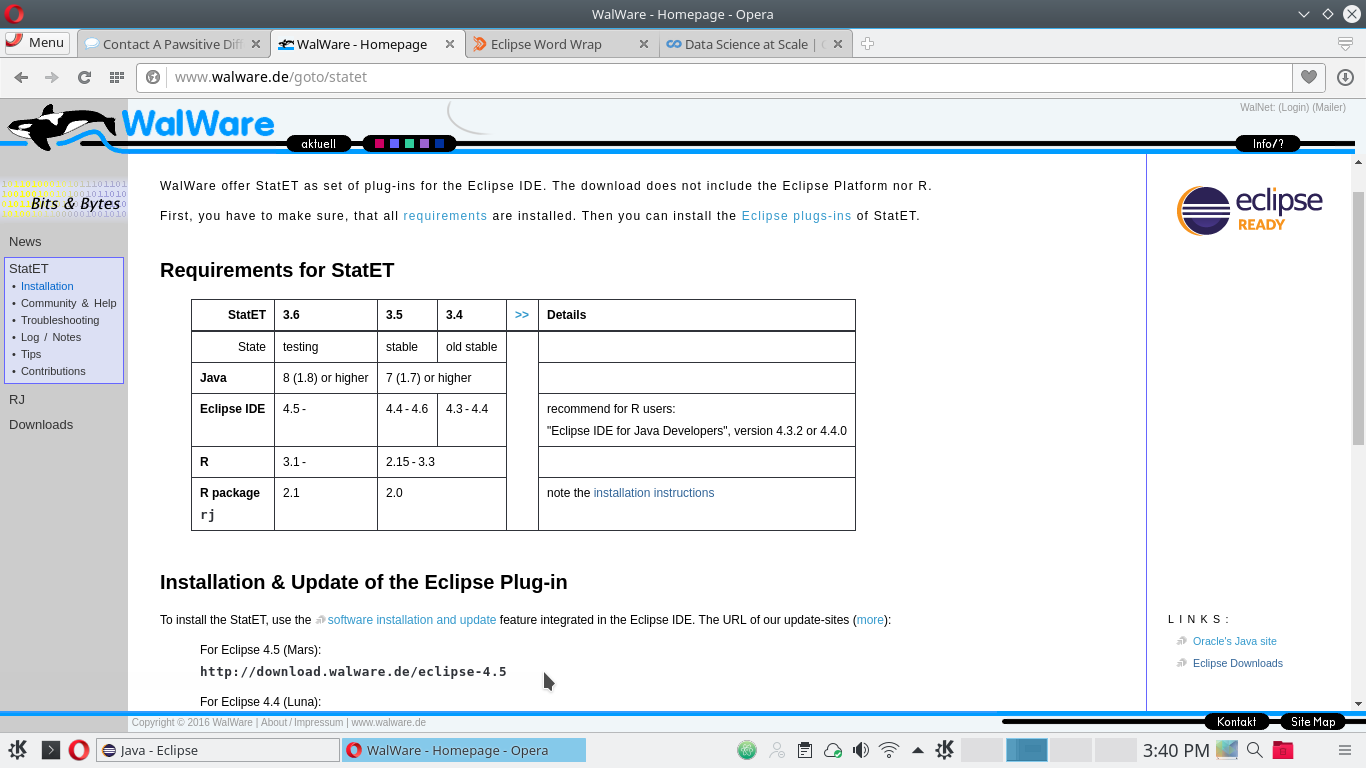
From Eclipse, install the Statet plugin. As with rj, the plugin can be downloaded and installed manually, or installed on the fly from Eclipse. You want the version that works with the version of Eclipse that you previously installed. In most cases, you will be using the current version of Eclipse with the most recent version of Statet, but if you have reason to maintain a legacy system, earlier versions of Statet are still available on Walware.
In the following screenshots, I install the current version for use with Mars Eclipse. You can click on the images to enlarge them.
Check Walware for the current version of statet and copy the download url. The cursor on the my screenshot (low and center) points towards the line I need to copy.
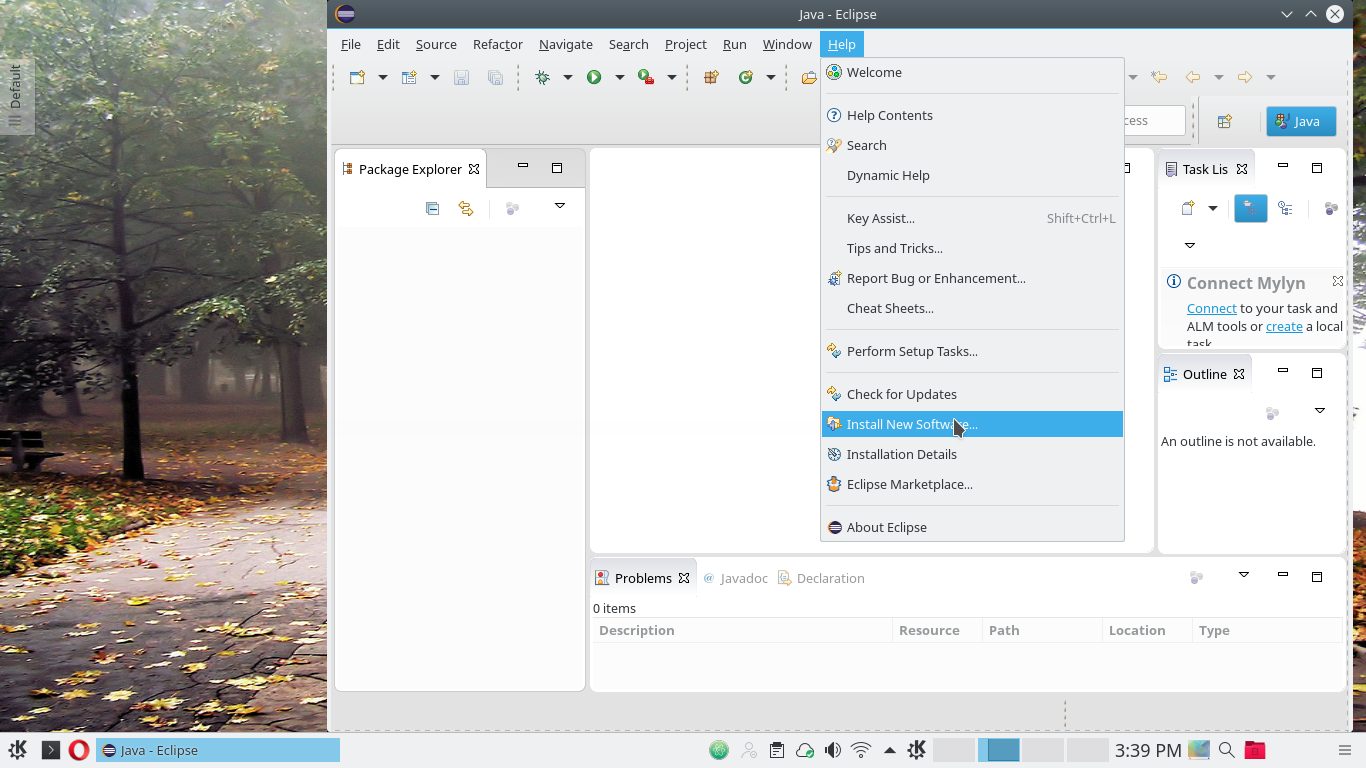
Now launch Eclipse. Select Help -> Install New Software.
Click Add (top right). A form opens where you paste the URL from Walware. You can also give the plugin a name. On the screenshot, I’m about to click OK.

Eclipse goes onto the Internet and retrieves some information from Walware. It finds 5 plugins. Check the box beside Statet. Do not select the other boxes.
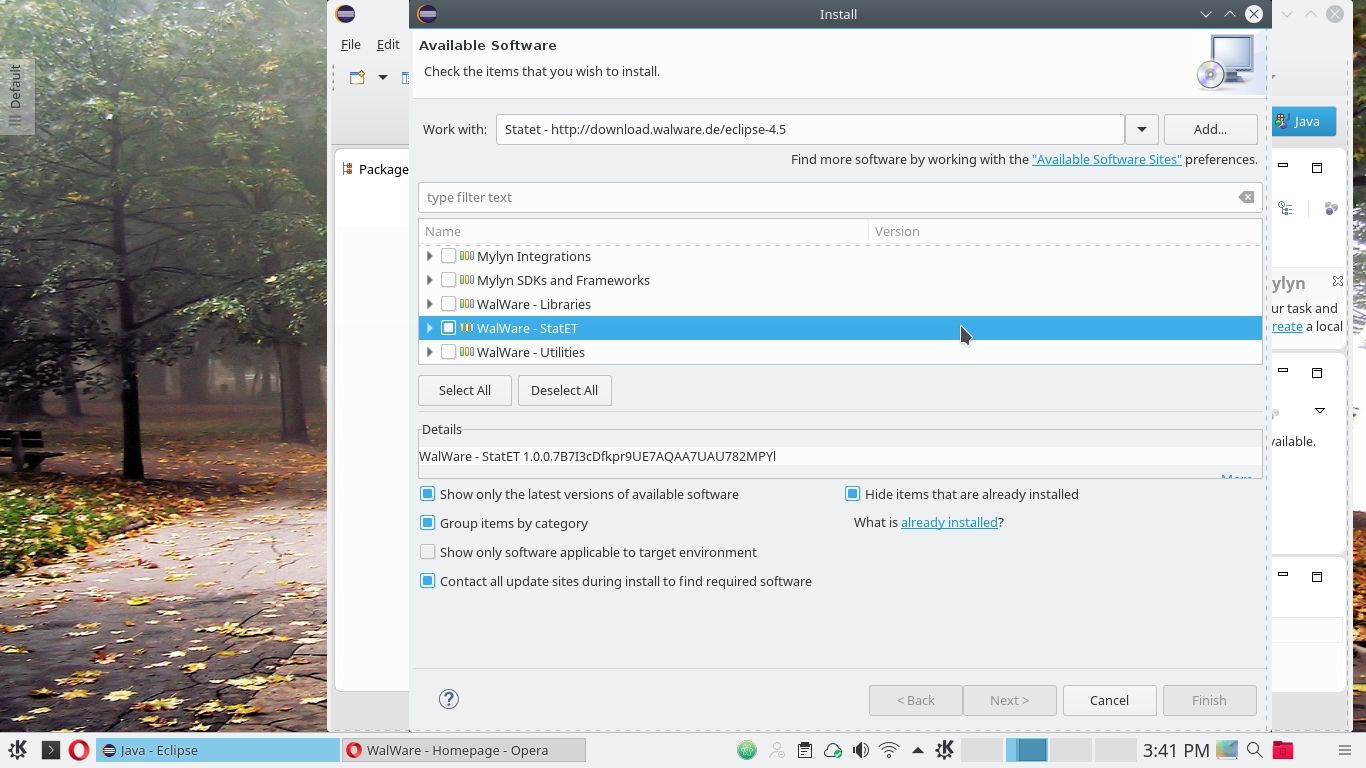
Click Next. The plugin will now download and install. Various screens will appear asking you to agree to the license and warning about unsigned content. Agree to everything and accept everything. Congratulations! You have Statet.
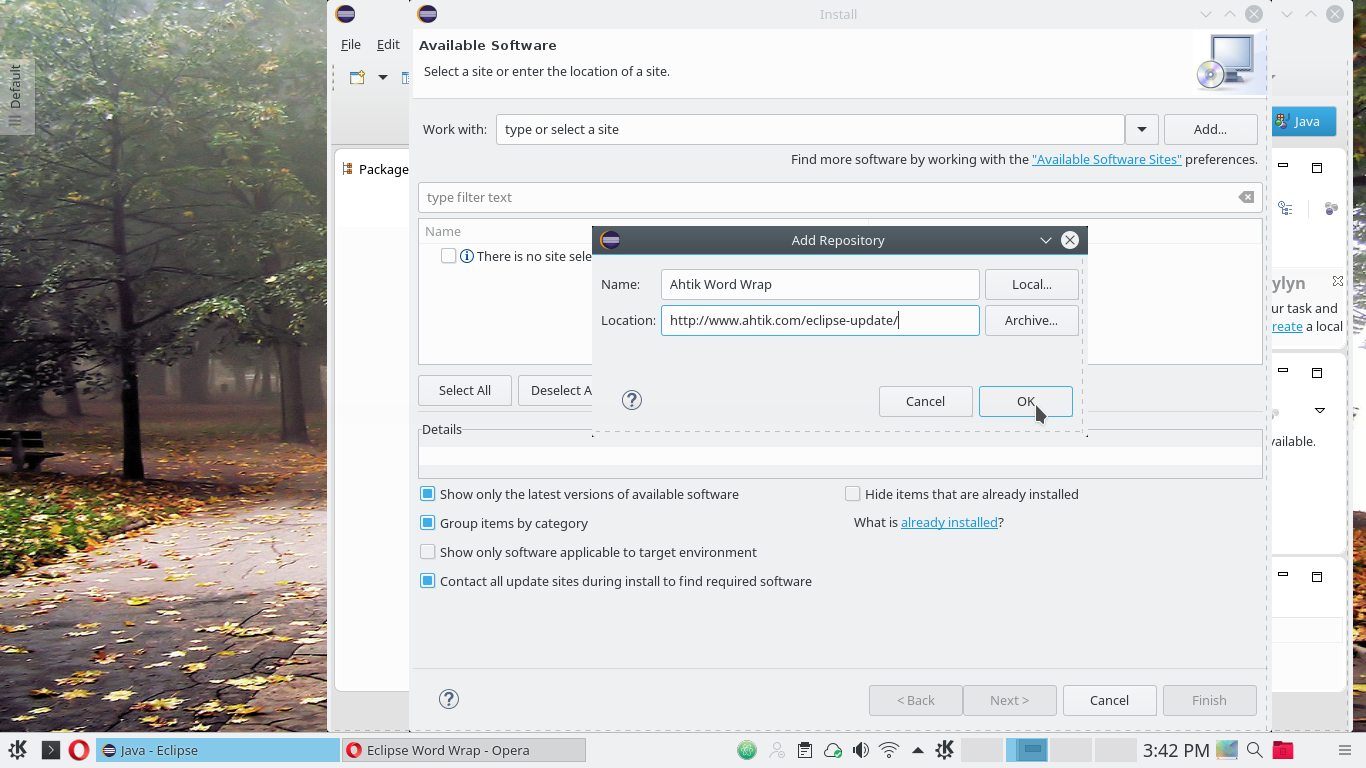
While we’re installing things, let’s grab Ahti Kitsik’s word wrap plugin. As before, select Help -> Install New Software. Click Add and insert Ahti’s download url for the plugin, http://www.ahtik.com/eclipse-update/. Give it a useful name, click OK and proceed as before.
Now exit Eclipse to complete the installation.
Install R packages rj and rj.gd
rj and rj.gd are R packages used to form a bridge between R and Java. You need these to run the R console from Eclipse. These packages are not hosted on Cran, and you need to download them from www.walware.de. Note that this step only works after Statet has been added to Eclipse.
- Launch R
- Navigate to Wahlbrink’s download page for rj and rj.gd.
- Copy the appropriate install code for the version you need and paste into your R console. Typically, you want the first line in the list. The other options refer to earlier versions of Statet, used with earlier versions of Eclipse. At the time of writing, you would enter the following code at the R prompt.
install.packages(c("rj", "rj.gd"), repos="http://download.walware.de/rj-2.0")
Under Linux, the previous step may take a few moments while the packages compile. You may get an error message to the effect that the system could not compile a simple JNI program. This means that you failed to correctly install the Java JDK, or that R cannot find it. Googling the error message leads to a helpful post on Stack-Overflow, which should resolve the issue. Basically, you need to run sudo R CMD javareconf before attempting to install rj and rj.gd.
If you work behind a firewall, you can do a manual install by downloading the packages from Walware through your browser, .
Configuring Eclipse
We have all the tools, but we’re not done yet. We still need to configure Eclipse so that it knows:
- Where to find the R version you are using
- How you want to run R (from which folder, with which Java, etc.)
- Where to find LaTeX and how to run it.
If you have never used Eclipse before, it is easy to get lost at this point. I have supplied detailed instructions with screen shots in part 2 of this tutorial.