As you search about ML.Net on Google, you’d find much content about working with that; but almost all do the identical machine learning tasks available on the model builder. So, I thought, why not do something a little more complex using that.
In this post, I want to share my primary idea of designing a simple trading strategy using the model builder tool. I’ve spent time establishing a basic logic that works. Note that this context’s priority is to walk through MS machine learning with algorithmic trading; it’s not essential whether the following strategy is profitable. (If there were an accurate and profitable algorithmic trading strategy, it wouldn’t be available for free!)
You’ll get an inspiring prospect, I hope. Please Keep exploring with me.
What You’ll Read:
Why do I think this project is worth considering?
A step-by-step roadmap to get the ball rolling:
Step 1: Choose a programming language.
Step 2: Determine what field/financial market your bot will work upon.
Step 3: Select a server.
Step 4: Determine your trading strategy.
Step 5: Deploy your strategy to your program.
Backtest your strategy
Why Do I Think Incorporating ML.Net With Algorithmic Trading Is Worth Considering?
Machine learning is one of those areas of programming which is very capable of invitations and creativity. But, are you limited to any particular language like Python or R to develop either AI or ML projects? Who says that?
Nowadays, many developers have started learning to program with C#. But, if you’re one of them, you’d probably have heard that C# is not the best choice to start programming or it’s just useful for windows applications which is a wrong belief.
So why did I choose machine learning, and why a trader bot project? I have two main reasons for that:
1. Trading is an everyday activity in almost everyone’s life; everyone buys and sells stuff. The difference is just about that stuff, and someone trades stocks, someone else buys and sells cars, or anything else. I understand that coding an advanced trader bot requires the knowledge of technical analysis and other related skills, but at this stage, I’m talking about trading.
Trading is something understandable for almost every single person. So I don’t want the primary bot to be too complicated; it is supposed to buy low-priced assets and sell them at their highest prices. Just that simple!
2. As you create a bot, it’s crucial to teach that trading bot how to do functions. I want to utilize ML.Net at this level. I will not use any strange machine learning tasks but show that even with such a level of simplicity, it’s possible to do something more beneficial than just predicting NY taxi fares!
Besides, that’s a project having a huge potential for development and adding new features which challenge your creativity.
There is a step-by-step guide on how to solve the puzzle in the following parts.
Step 1: Choose a Programming Language
Although this step seems routine or even a little paradoxical in this particular article, it’s important enough to get mentioned. It’s up to you what programming language works for you more comfortably. When it comes to machine learning and AI, almost everyone believes that Python is the best choice.
But as ML.Net Has been designed for .NETdevelopers and supports C# and F#, I’ve written my code snippets in C#. However, you can incorporate ML.Net functions in Python via NimbusML.
Step 2: Determine What Field/Financial Market Your Bot Will Work Upon
This part is often skipped in many robot building tutorials out there, while it’s as crucial as required programming knowledge! You have to decide what asset you’re going to trade. (For example, stocks, currencies, and cryptos).
If you’d ask my opinion, I highly recommend fiat currencies, as they follow logical trends and are easier to predict their behavior. Such an approach will decrease your risks due to fewer fluctuations in comparison with other types of assets.
Let’s try to establish a strategy based on the EUR/USD chart, later in this article.
Step 3: Select a Server
You require a reliable server to call and send your desired exchange/broker API requests.
Of course, in the stage of building your robot, you can utilize your computer as a server (or use a free host). But in the main stage of the robot’s operation, which has to be on a 24 hours basis, your local server will no longer be a suitable choice. Therefore, I have two recommendations for you:
1. Utilize Raspberry Pi as a server.
2. Use cloud hosting.
Executing a bot via Raspberry Pi seems to be an exceptional idea. Try it if you’re interested. Although, most people use cloud hosting services like Azure and AWS. You can also use MetaTrader 5 VPS. It’s an efficient distributed computing service that I’ve been using for a few similar projects.
Step 4: Determine Your Trading Strategy.
In the beginning, let’s try to establish a simple strategy that works. Here, I chose regression analysis. It’s pretty simple; pick the asset chart data and draw a trend line over a particular period. At this stage, the model builder tool comes into the game and helps you create a trend line (the same regression line) with high accuracy. Of course, you’re presumably familiar with linear regression.
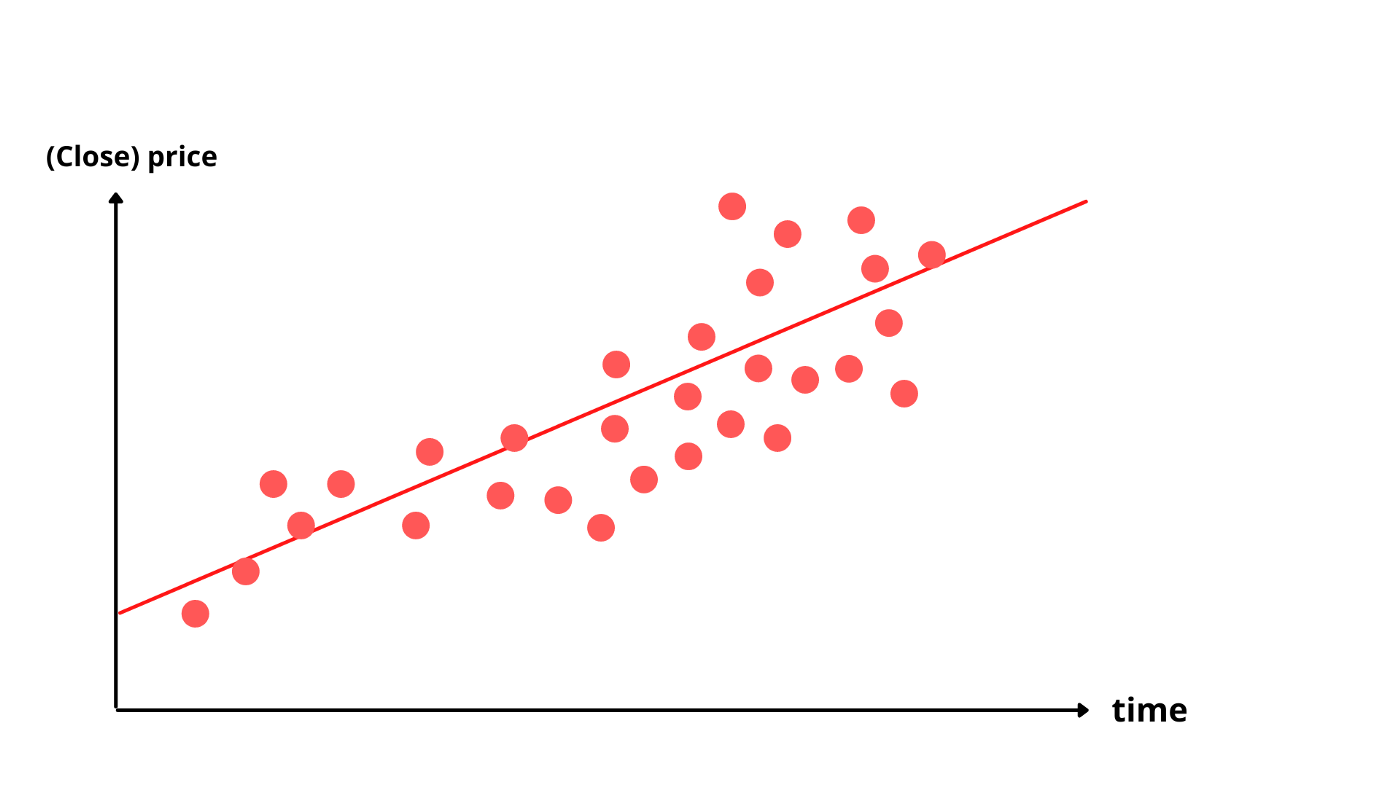
A linear regression graph is something like this sample schema. (Sorry, I’m not very good at painting.) Though the prices have many fluctuations, the total trend usually matches a trend line like this drawn one. Our strategy is based on this point. Our bot will place buy/sell orders at points where the price would deviate significantly from the regression line. How could the bot understand when it’s time to place orders?
My idea is to get real-time market prices via the exchange or broker’s API and then compare it with the regression predictor model’s output. Plus, it’s a good idea to utilize the RSI indicator to confirm our trading signals.
Step 5: Deploy Your Strategy to Your Program
As I’m not looking forward to rebuilding the wheel, I don’t define any class or method for my bot from scratch. I suggest you utilize trading software DLL libraries instead. Likewise, several solutions are available, and each one has its benefits. The one choice that I prefer to use is MetaTrader 5, as it supports object-oriented programming. Before getting into the code sample, let’s get back to the model builder and class library for trading functions.
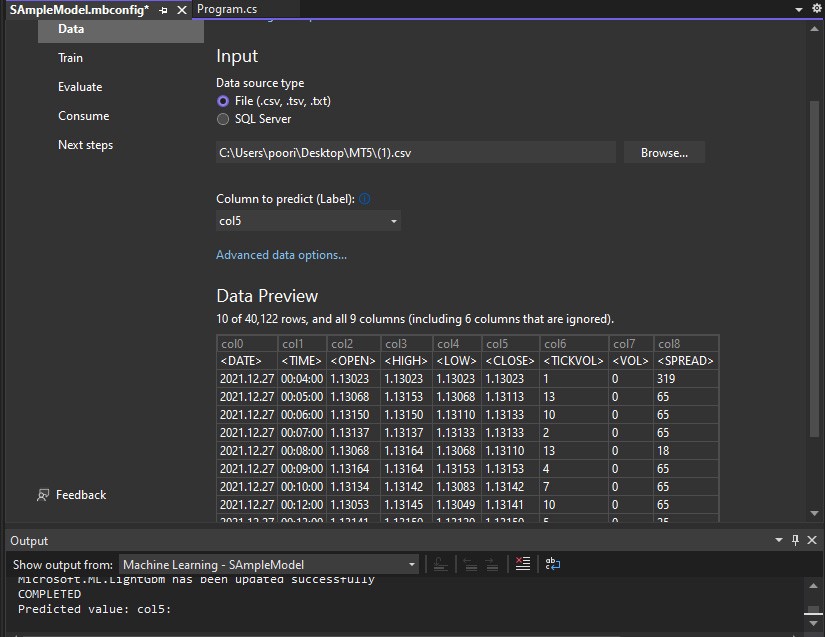
Create a .Net Core console app. Click right on your project’s solution, manage NuGet packages, and install these two packages: Microsoft.ML and MQL4CSharp. Let’s start with the relatively simple task, creating a regression model utilizing past price data of EUR/USD. You can use some known online data sources like Kaggle Datasets, but I operate differently to get the historical market data. If you like to learn about that, click here.
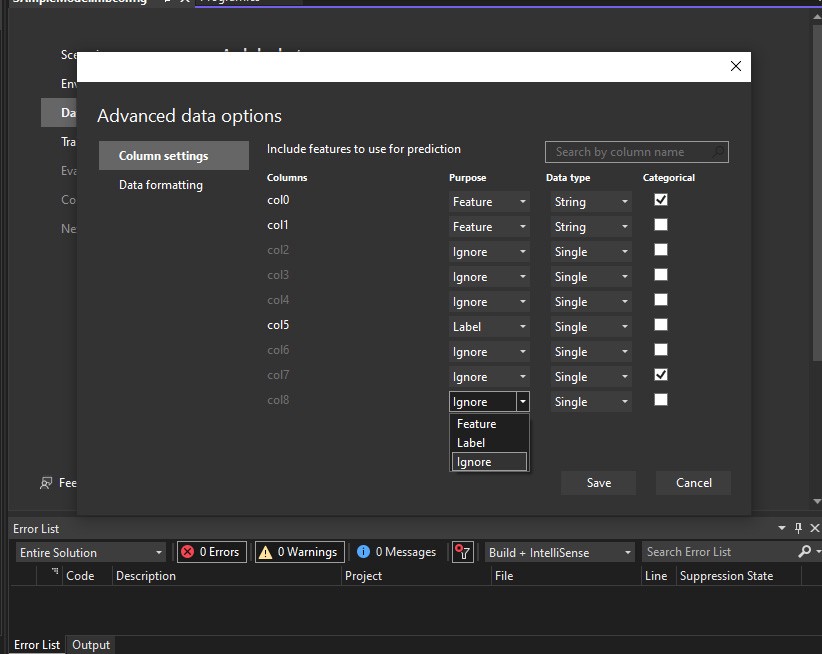
Working with ML.Net Model Builder is like a piece of cake, meanwhile explained entirely on Microsoft docs. It autogenerates a pipeline based on the model inputs to predict the next price. I set the date and time as the features (model’s inputs) and the close (or lastest) price on the corresponding date as the label (model’s output). Then, in advance data options, change the other columns’ purposes to ignore.
Now, let’s see what kind of use the MQL4CSharpclass library provides for your project. It contains all MQL5 language (MetaTrader 5 specific language, similar to C++) functions converted to C#. I selected a few methods from the DLL class library for this test project. Ready to get into the code template?
First, add a new class to the project and inherit that from the MQLBase class. Then in the OnTick() method’s block, load and execute the model.
public override void OnTick()
 {
 //Load and use the model to make predictions.
     var sampleData = new BOtModel.ModelInput()
    {
       Col0 = @"" ,
       Col1 = @"" ,
    };
     var result = BOtModel.Predict(sampleData);
 }
Now execute the bot’s logic like this:
public override void OnTick()
 {
   var sampleData = new BOtModel.ModelInput()
 {
    Col0 = @"" ,
    Col1 = @"" ,
  };
    var result = BOtModel.Predict(sampleData);
 }

//Define these two variables based on your customized parameters.

double rsi = iRSI(string symbol, int timeframe, int period, int applied_price, int shift);
double closeprice = iClose(string symbol, int timeframe, int shift);

//Define conditional statements to place buy/sell orders.
     if (rsi > 80 && Convert.ToDouble(result) < closeprice)
  {

//Sell order
OrderSend(string symbol, int cmd, double volume, double price, int slippage,
double stoploss, double takeprofit, string comment, int magic, DateTime expiration, MQL4CSharp.Base.Enums.COLOR arrow color);
   }
      else if (rsi  closeprice)
   {

//Buy order
OrderSend(string symbol, int cmd, double volume, double price, int slippage,
double stoploss, double takeprofit,string comment, int magic, DateTime expiration, MQL4CSharp.Base.Enums.COLOR arrow color);
   }
  }
The required parameters for the methods are explained briefly at the following links:
1. iRsi()
2. iClose()
3. OrderSend()
If you are not familiar with financial markets, you might ask what the RSI indicator is? Thoroughly, it’s a technical indicator that allows you to know whether an asset is overbought or oversold so that you can realize when the price is intended to pull back or rise.
It’s is one of the most crucial actions after creating your Trading Robot. Accessing the historical data is, as I mentioned in the past paragraphs. I do not intend to delve into this matter in this post, and I will thoroughly explain backtesting in one of my future articles.
Meanwhile, there is something that I prefer to mention here. When getting backtests, it’s essential to make accurate calculations that require spending a lot of time and energy manually.
The algorithmic trading platforms can facilitate your efforts at this level as well. One of my favorite services related to this issue is the MQL5 Cloud Network, which lets you utilize too many local PC CPUs power available on the network to enhance your calculations either speed or accuracy.
Summary
So far now, I have created a regression model based on the EUR/USD past prices data and then coded the bot’s functionality logic consuming that model. Nevertheless, some points can still be added, like connection to the data banks, saving the robot’s trade functions records, designing a user-friendly dashboard, and more.
In my future posts, I’ll expand this content and explain further details on developing and adding complementary features to the bot.
Thanks for reading this article, and I hope it was helpful for you.